
I decided that I would put my crafty skills to good use and create a tutorial designed specifically for making doggy tutus. With a velcro elastic band for an easy on/off, and a tulle-free belly for comfort and soil prevention during potty time, these tutus will make any dog win this years costume contest!
Here are the steps for making your very own dog tutu in 30 minutes for less than $10:
1. Gather the materials:
- Scissors
- Piece of Cardboard
- 1" No-Roll Elastic = $1.79
- Sew-In Velcro = $3.99
- 1 Spool of 6" tulle = $3.99 (one spool comes with 25 yards of tulle and can usually be found at any craft or fabric store. Sometimes its located in the bridal department)
 |
| Spool of 6" Tulle |
2. Measure your dogs waist:
Decide where you want the tutu to sit on your dogs body and measure the circumference of that part of the body. I decided that I wanted Athenas tutu to sit about 3/4 of the way down her back so that the tutu would sit snug and not fall down past her waist. To measure Athena for the tutu, I simply used the piece of elastic and wrapped it around her body where I wanted the tutu to sit. I made sure not to stretch the elastic during this measurement. After measuring the piece of elastic, I took off an extra two inches to allow for stretching. So, if I measured Athenas waist to be 20", I cut the piece of elastic to actually measure 18".
 |
| Somebody had a hard time sitting still for their measurement =) |
Next I cut a 1" piece of velcro (so, 1" of hook and 1" of loop that velcro together). Using my sewing machine, I secured the hook and loop pieces to opposite ends of the elastic making sure to backstitch for durability.


4. Cut Pieces of Tulle
This is when you decide how short or long you want your tulle to stick up from your dogs waist. A tutu for a small dog will need shorter pieces of tulle than a tutu for a large dog. To make Athenas tutu, I cut 16" pieces of tulle. Once attached to the elastic using a knot, the tulle will stick out about 7 inches from Athenas waist.
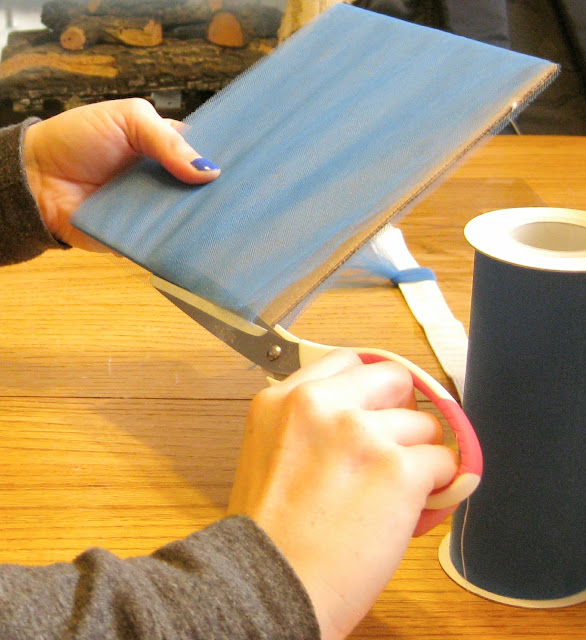
It is easy to cut tulle from the 6" spools by simply wrapping the tulle around a flat object that measures half of the desired length of your tulle pieces. For example, I wanted 16" pieces of tulle, so I cut a piece of cardboard to measure 8". Using my 8" piece of cardboard, I can wrap my tulle around and around and then make one cut to produce a stack of 16" tulle pieces.
 |
| Wrapping my tulle around the 8" piece of cardboard |
 |
| I make one cut along one end of my piece of cardboard to get... |
 |
| A stack of 16" pieces of tulle |
Once the tulle has been cut, its time to start tying it onto the elastic band to create the tutu. Because the tutu will be worn by a dog, its important that no tulle is tied to the underside of the elastic band. This ensures comfortability for the dog when they sit and lay down as well as prevents soiling of the tutu when your dog has to go potty!
To start tying the tulle onto the elastic, I connect the velcro pieces to create an elastic band. I then use my leg to stabilize the elastic as I tie on the pieces of tulle. Start tying tulle onto the top of the elastic band and continue around 3/4 of the elastic. Note that the velcro will be on the underside of the dog and will not have any tulle covering it.
Heres how to make the knot to attach the tulle to the elastic:
Find the middle of the piece of tulle

Slide the tulle under the elastic band

Make a knot by pulling both ends of the tulle through the loop

Tighten the knot by pulling the two ends of tulle toward your body

This is what the knot looks like if you turn your elastic band over

Your tutu will begin to look like this as you tie more pieces of tulle to the elastic band

6. Add More Fluff
Once you have tied tulle pieces around 3/4 of your elastic band, your tutu is essentially finished and ready to wear! Personally, I like a very fluffy tutu, so I added more pieces of tulle on top of the tulle that I already attached to my elastic band like this:

The finished product:

7. Wear it Out and About!
Now you have a very comfy tutu that your dog can sport out on the town or when trick-or-treating on Halloween! Here are a few pictures of Athena wearing her tutu (this bright blue tutu is part of her Halloween costume...can you guess what she is going to be?):


Please leave a comment below or e-mail us at PitlandiaPooch@gmail.com if you have any questions or suggestions for improvements to this tutorial!
Check out our tutorial on how to make a DIY Dog Collar Fabric Flower to add to your dogs stylin wardrobe!


0 komentar:
Posting Komentar